> ## Documentation Index
> Fetch the complete documentation index at: https://docs.goldsky.com/llms.txt
> Use this file to discover all available pages before exploring further.
# Deploy a Mirror pipeline
> Step by step instructions on how to create a Goldsky Mirror pipeline.
You have two options to create a Goldsky Mirror pipeline:
1. **[Goldsky Flow](/mirror/create-a-pipeline#goldsky-flow)**: With a guided web experience in the dashboard
2. **[CLI](/mirror/create-a-pipeline#creating-mirror-pipelines-with-the-cli)**: interactively or by providing a pipeline configuration
## Goldsky Flow
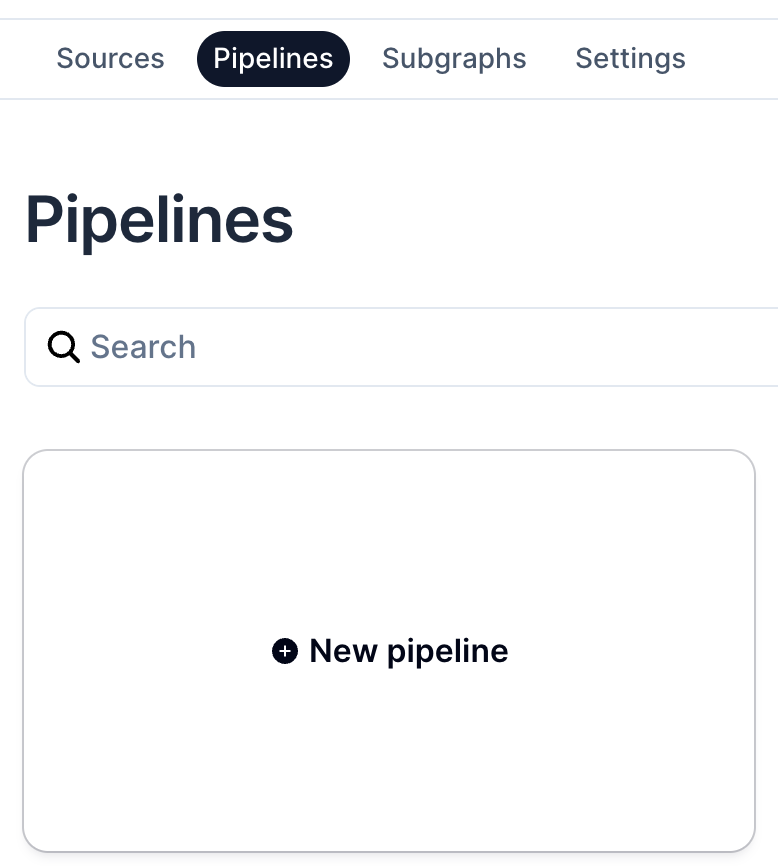
Flow allows you to deploy pipelines by simply dragging and dropping its component into a canvas. You can open up Flow by going to the [Pipelines page](https://app.goldsky.com/dashboard/pipelines) on the dashboard and clicking on the `New pipeline` button.
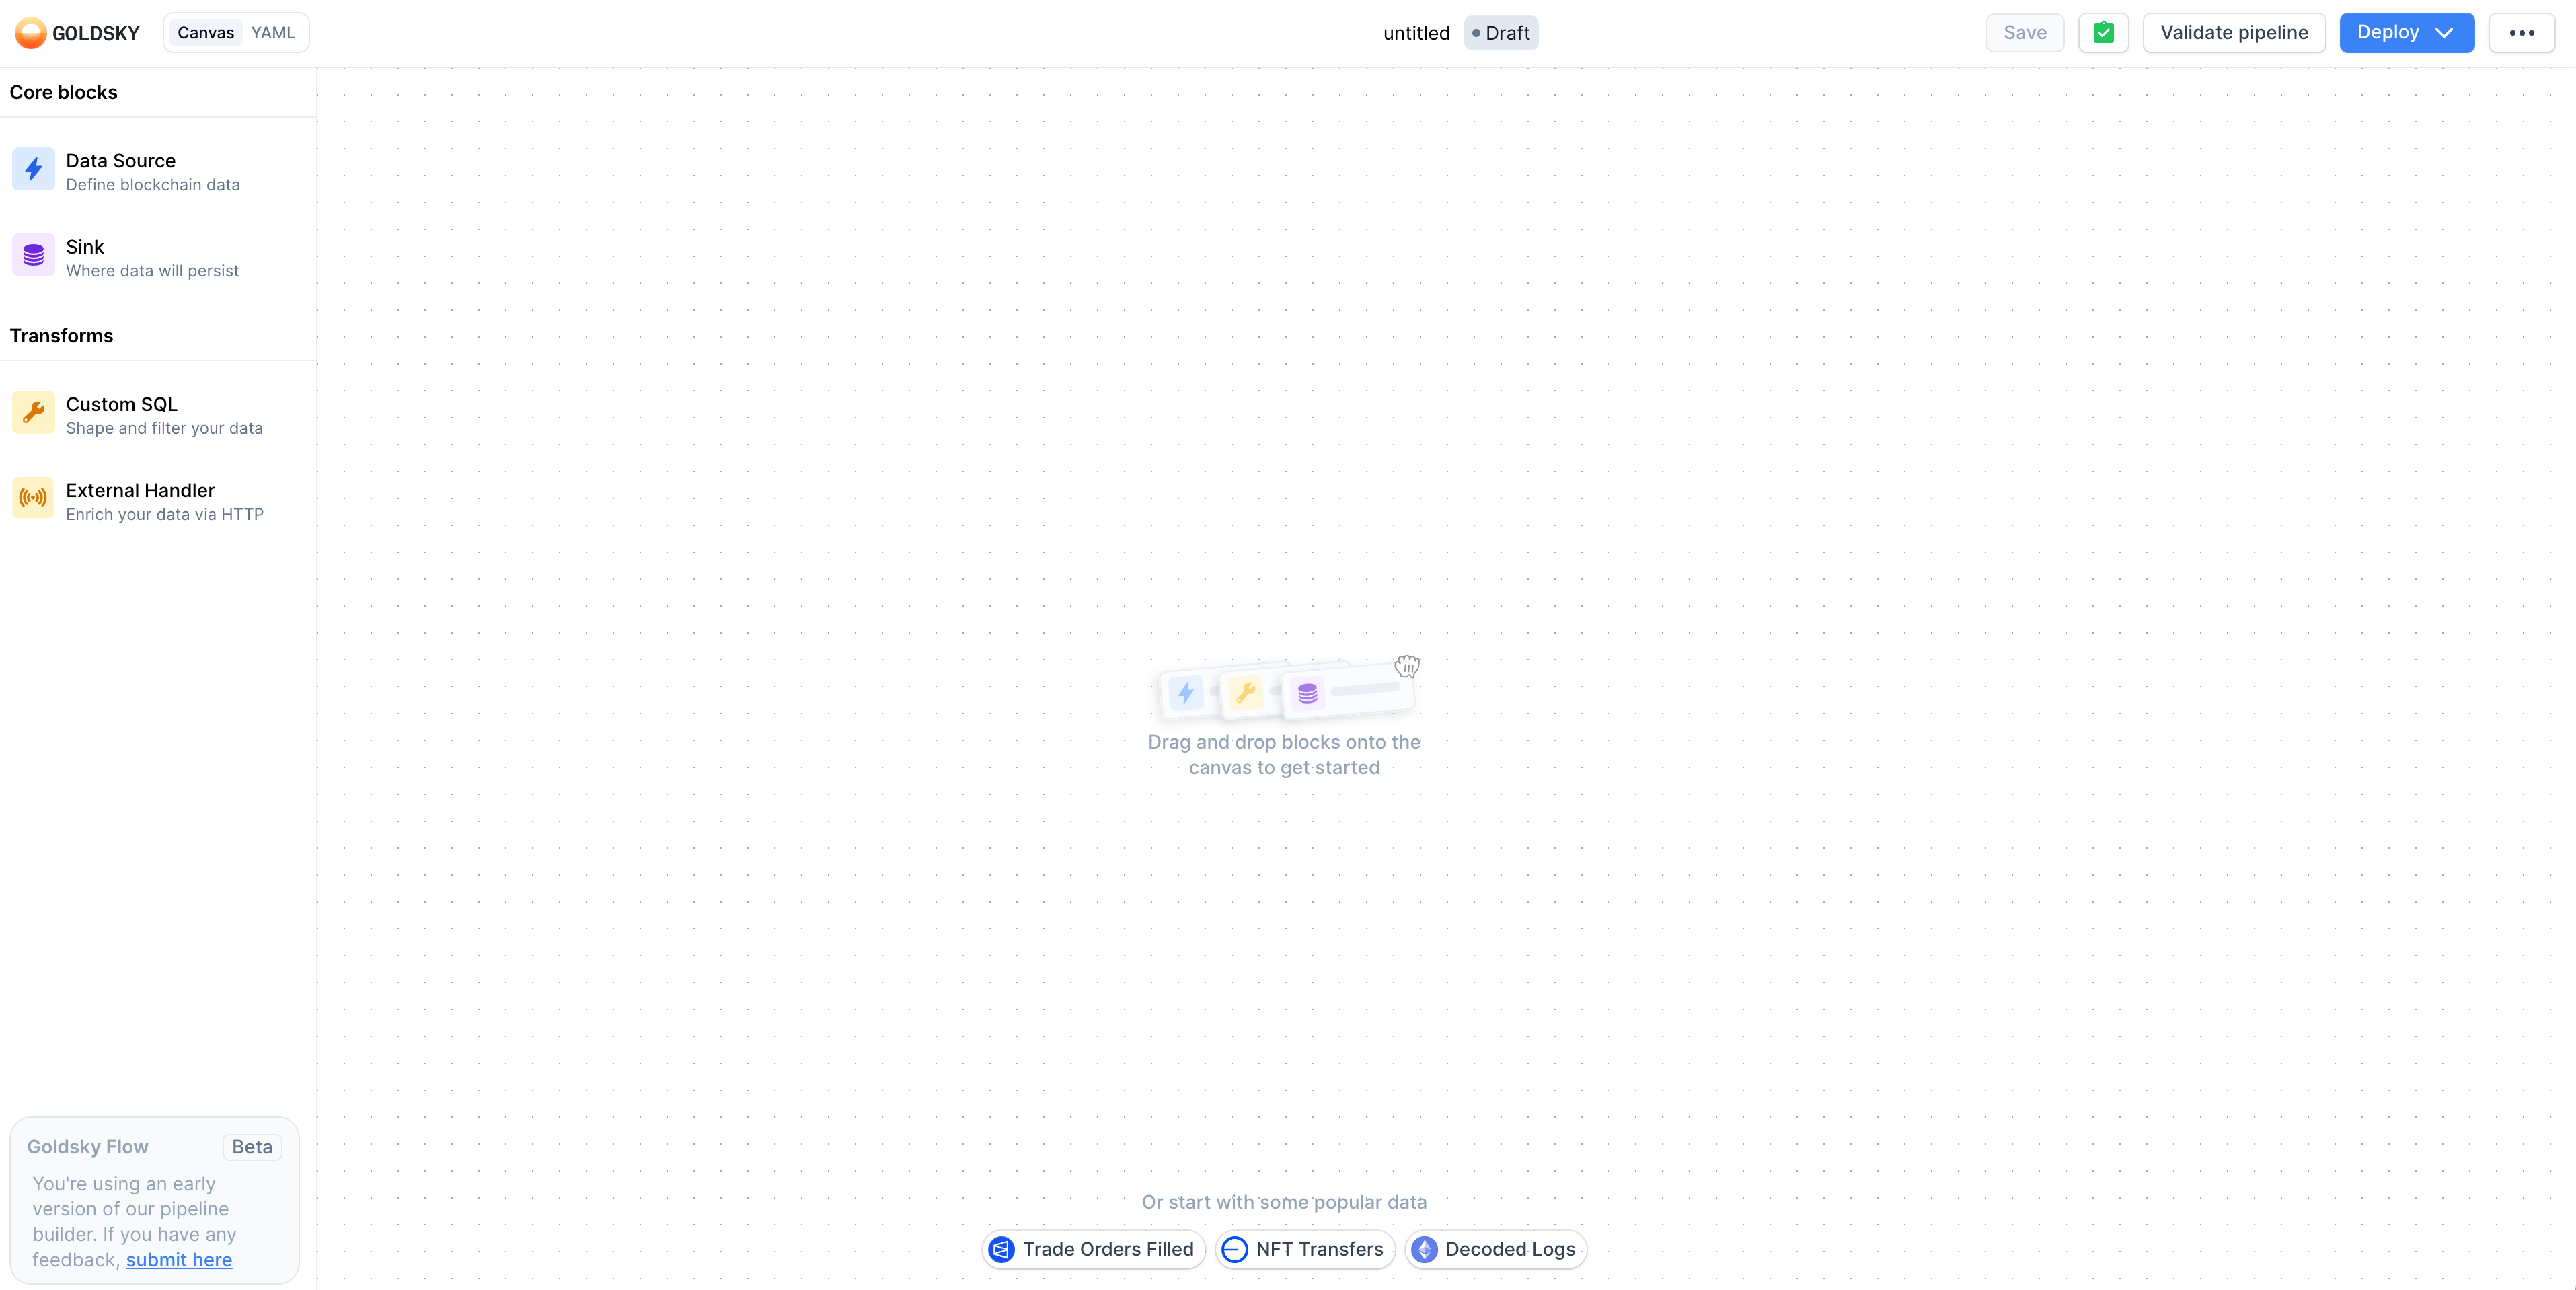
 You'll be redirected to Goldsky Flow, which starts with an empty canvas representing the initial state.
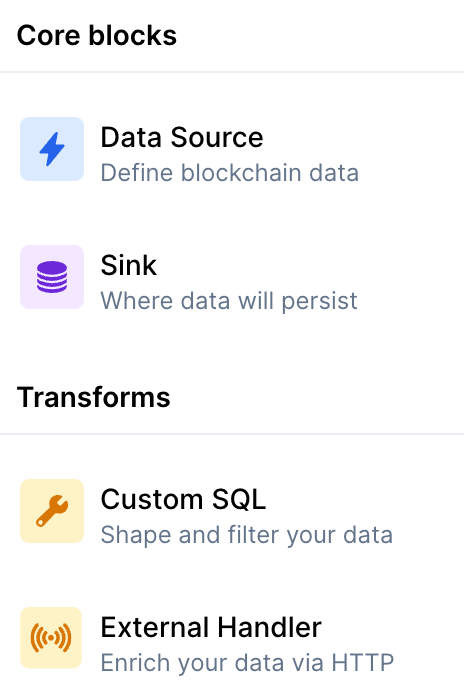
 The draggable components that will make up the pipeline are located on the left side menu.
 Let's now look at how we can deploy a simple pipeline; in the following section we are going to see the steps needed to stream Ethereum raw logs into a ClickHouse database. Since the steps are the same for any pipeline, feel free to adapt the components to fit your specific use case.
1. **Select the Data Source**
Start by dragging and dropping a `Data Source` card onto the canvas. Once you do that, you'll to need select the chain you are interested in. We currently support [100+ chains](/chains/supported-networks). For this example we are going to choose `Ethereum`.
Let's now look at how we can deploy a simple pipeline; in the following section we are going to see the steps needed to stream Ethereum raw logs into a ClickHouse database. Since the steps are the same for any pipeline, feel free to adapt the components to fit your specific use case.
1. **Select the Data Source**
Start by dragging and dropping a `Data Source` card onto the canvas. Once you do that, you'll to need select the chain you are interested in. We currently support [100+ chains](/chains/supported-networks). For this example we are going to choose `Ethereum`.
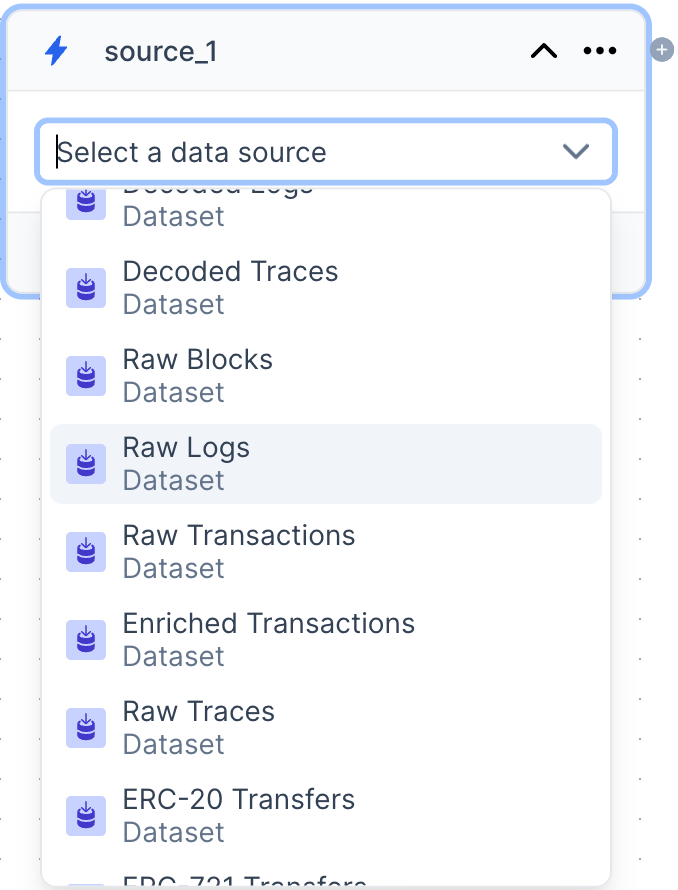
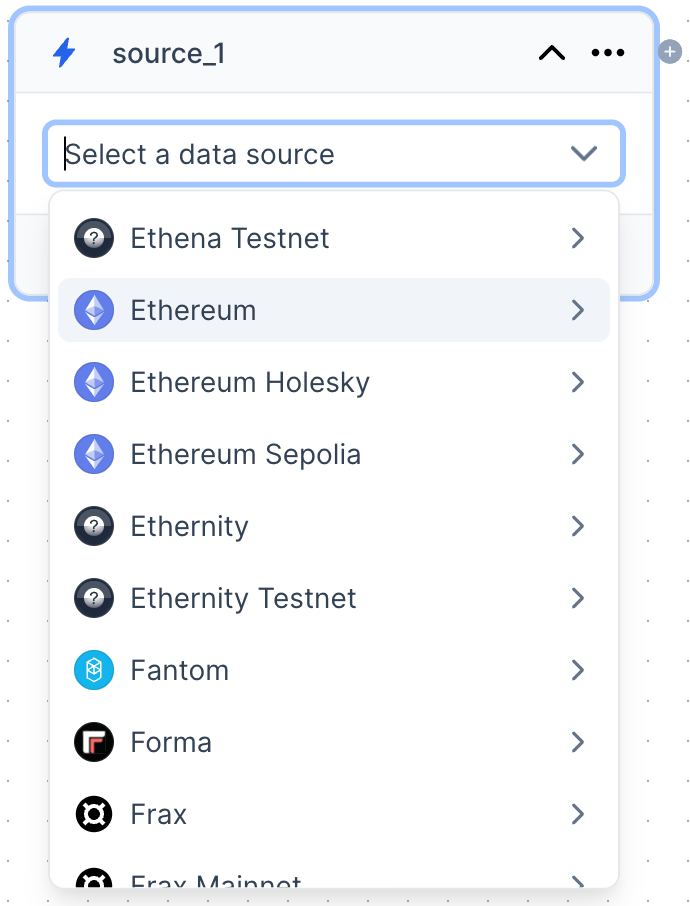 Next, we need to define the type of data source we want to use:
* Onchain datasets: these are [Direct Indexing datasets](/mirror/sources/direct-indexing) representing both raw data (e.g. Raw Blocks) as well as curated datasets (e.g. ERC-20 Transfers)
* [Subgraphs](/mirror/sources/subgraphs): this can be community subgraphs or existing subgraphs in your project for the choosen network
For this example, we are going to choose `Raw Logs`.
Next, we need to define the type of data source we want to use:
* Onchain datasets: these are [Direct Indexing datasets](/mirror/sources/direct-indexing) representing both raw data (e.g. Raw Blocks) as well as curated datasets (e.g. ERC-20 Transfers)
* [Subgraphs](/mirror/sources/subgraphs): this can be community subgraphs or existing subgraphs in your project for the choosen network
For this example, we are going to choose `Raw Logs`.
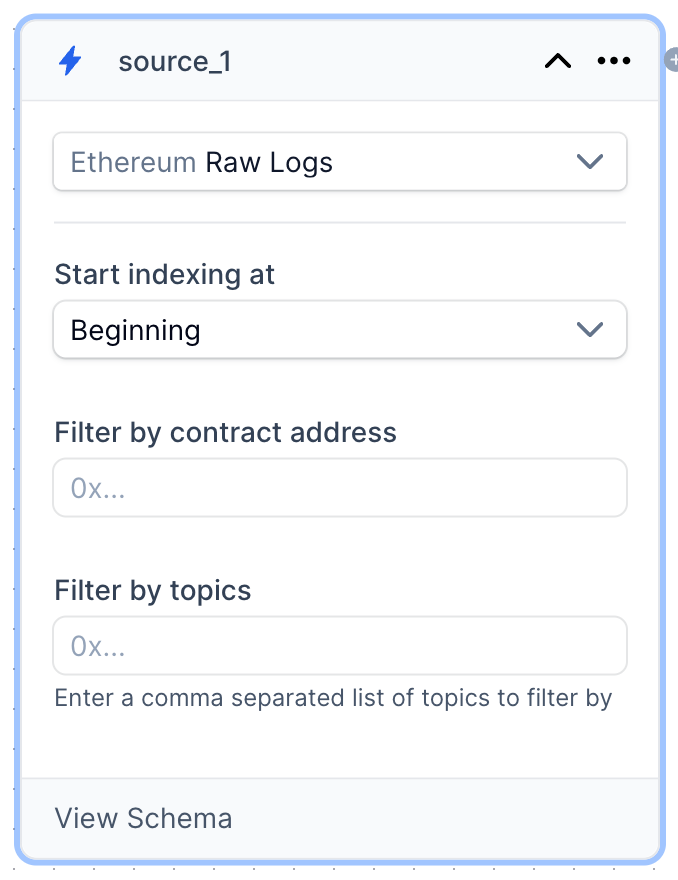
 After selecting the data source, you have some optional configuration fields to use, in the case of `Onchain Datasets` you can configure:
* `Start indexing at`: here you can define whether you want to do a full backfill (`Beginning`) or read from edge (`Current`)
* `Filter by contract address`: optional contract address (in lowercase) to filter from
* `Filter by topics`: optional list of topics (in lowercase) to filter from, separated by commas.
* `View Schema`: view the data schema to get a better idea of the shape of the data as well as see some sample records.
After selecting the data source, you have some optional configuration fields to use, in the case of `Onchain Datasets` you can configure:
* `Start indexing at`: here you can define whether you want to do a full backfill (`Beginning`) or read from edge (`Current`)
* `Filter by contract address`: optional contract address (in lowercase) to filter from
* `Filter by topics`: optional list of topics (in lowercase) to filter from, separated by commas.
* `View Schema`: view the data schema to get a better idea of the shape of the data as well as see some sample records.
 2. **(Optional) Select a Transform**
Optionally select a Transform for your data by clicking on the `+` button at the top right edge of the `Data Source` card and you'll have the option to add a Transform or a Sink.
2. **(Optional) Select a Transform**
Optionally select a Transform for your data by clicking on the `+` button at the top right edge of the `Data Source` card and you'll have the option to add a Transform or a Sink.
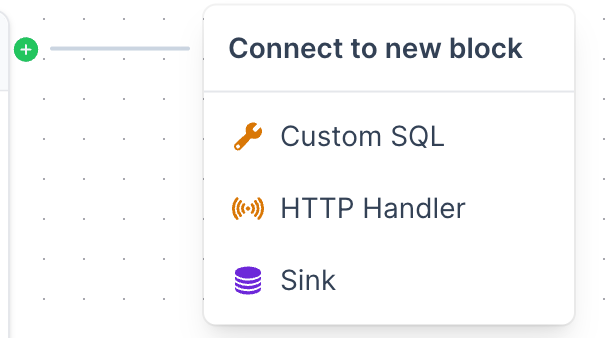 Tranforms are optional intermediate compute processors that allow you to modify the original data (you can find more information on the support Transform types [here](/mirror/transforms/transforms-overview)). For this example, we are going to create a simple SQL transform to select a subset of the available
data in the source. To do that, select `Custom SQL`.
Tranforms are optional intermediate compute processors that allow you to modify the original data (you can find more information on the support Transform types [here](/mirror/transforms/transforms-overview)). For this example, we are going to create a simple SQL transform to select a subset of the available
data in the source. To do that, select `Custom SQL`.
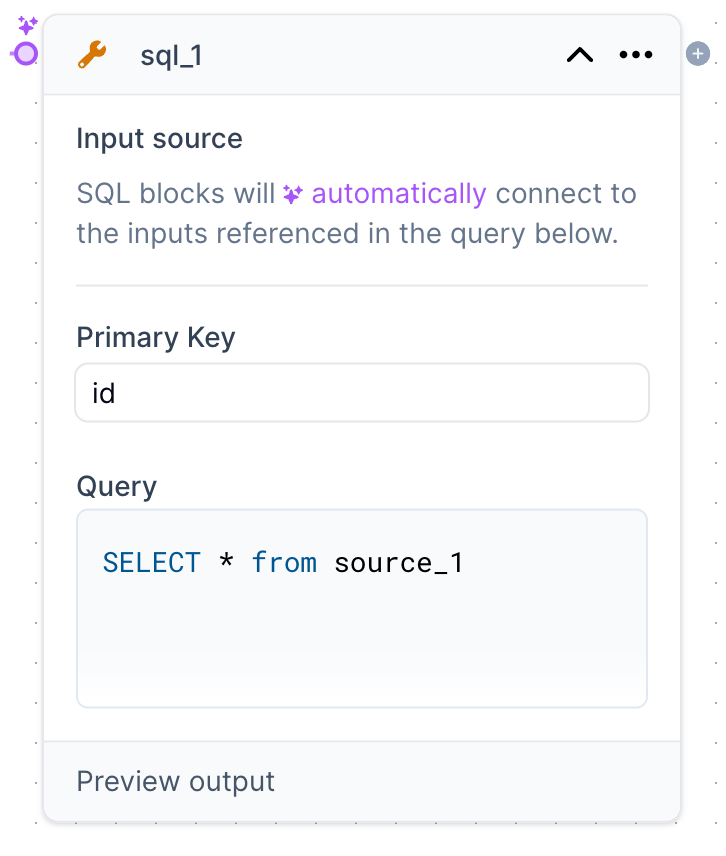 Click on the `Query` field of the card to bring up the SQL editor.
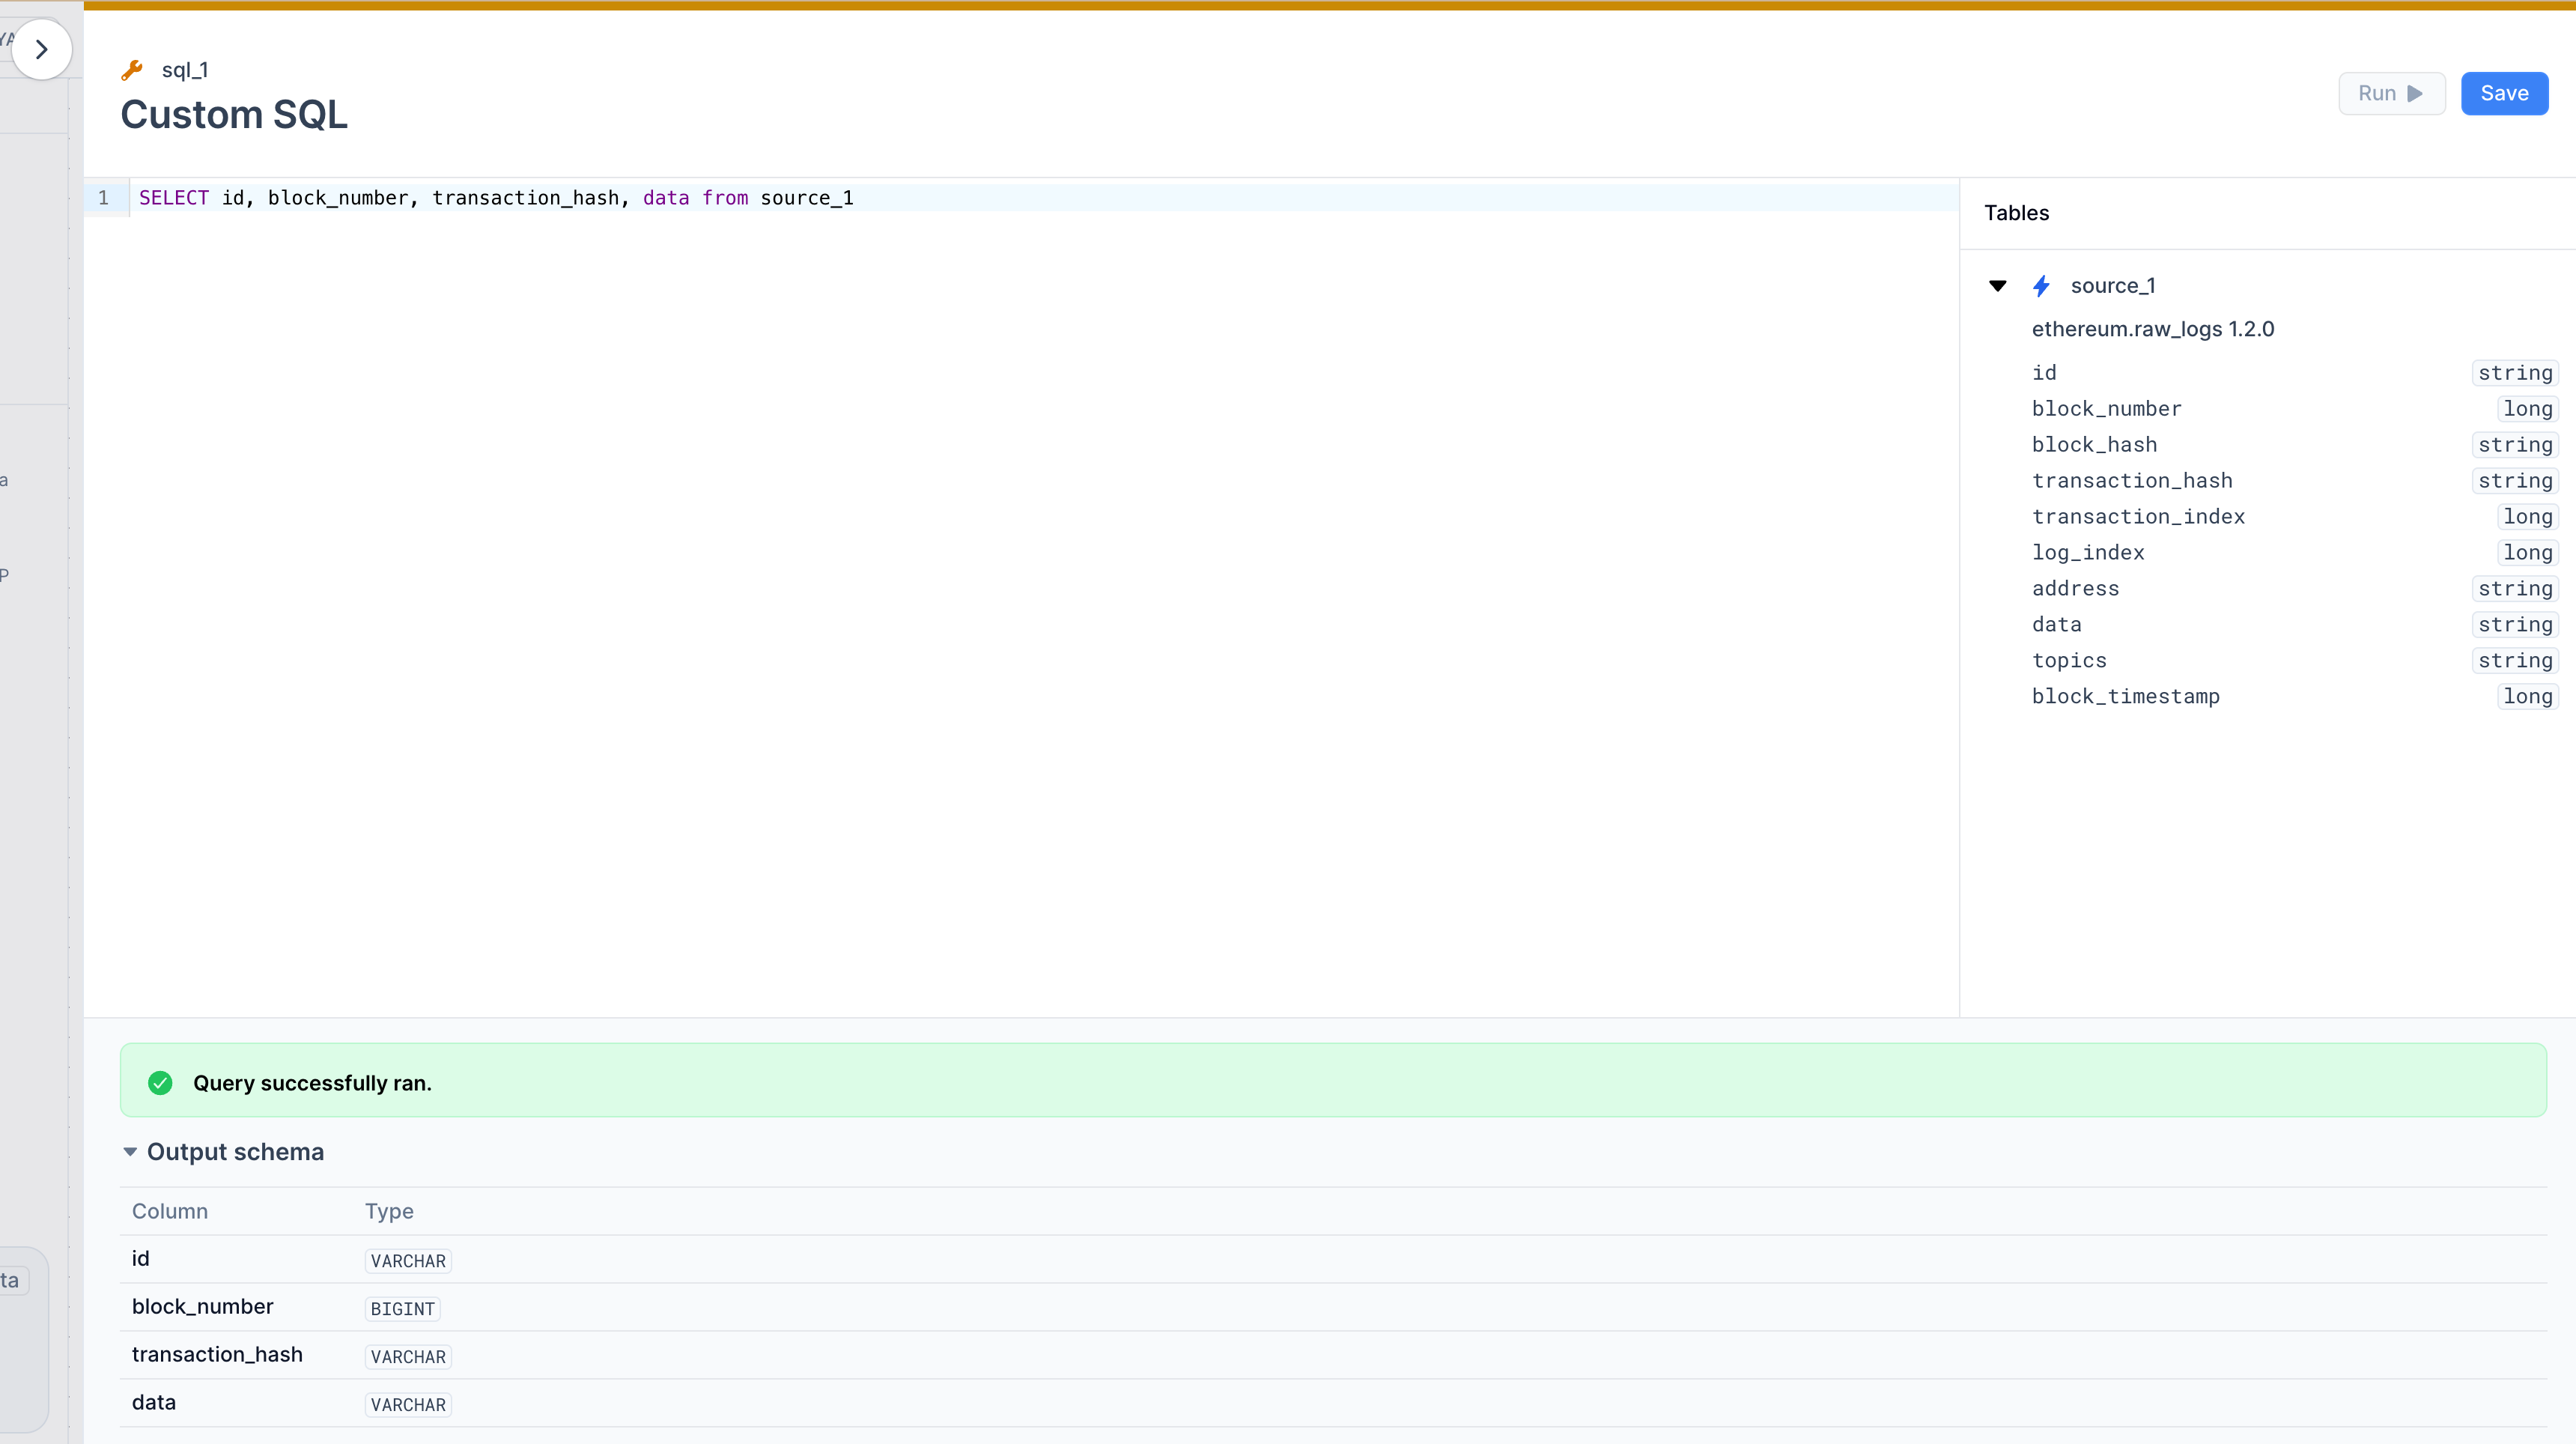 In this inline editor you can define the logic of your transformation and run the
SQL code at the top right corner to experiment with the data and see the result of your queries. For this example we are adding `SELECT id, block_number, transaction_hash, data FROM source_1`
If you click on the `Run` button on the top right corner you'll see a preview of the final shape of the data. Once satisfied with the results in your Transforms, press `Save` to add it to the pipeline.
3. **Select the Sink**
The last pipeline component to define is the [Sink](/mirror/sinks/supported-sinks), this is, the destination of our data. Click on the `+` button at the top right edge of the `Transform Card` and select a Sink.
In this inline editor you can define the logic of your transformation and run the
SQL code at the top right corner to experiment with the data and see the result of your queries. For this example we are adding `SELECT id, block_number, transaction_hash, data FROM source_1`
If you click on the `Run` button on the top right corner you'll see a preview of the final shape of the data. Once satisfied with the results in your Transforms, press `Save` to add it to the pipeline.
3. **Select the Sink**
The last pipeline component to define is the [Sink](/mirror/sinks/supported-sinks), this is, the destination of our data. Click on the `+` button at the top right edge of the `Transform Card` and select a Sink.
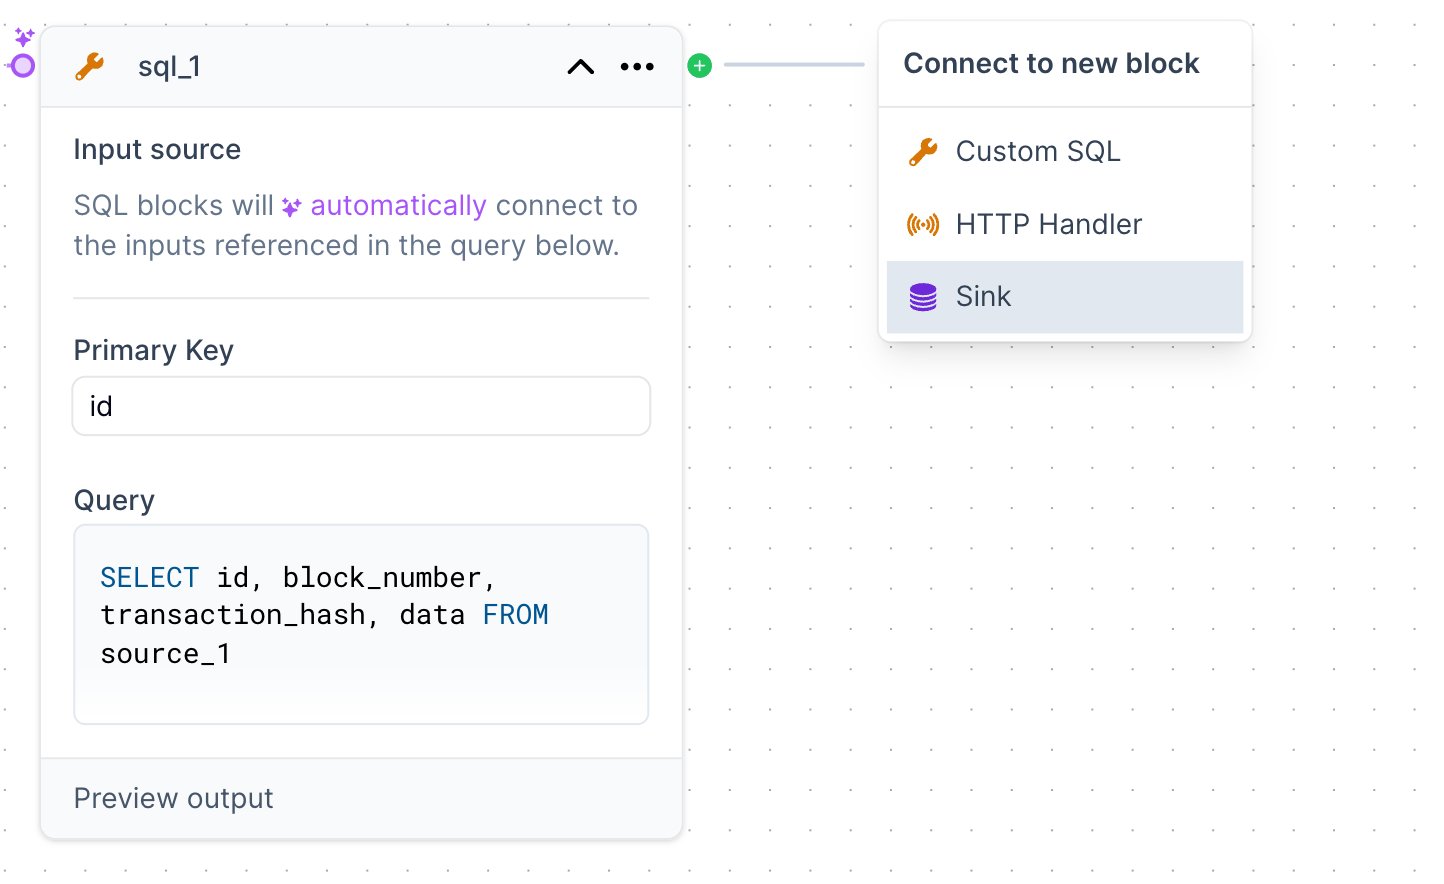 If you already have configured any sinks previously (for more information, see [Mirror Secrets](/mirror/manage-secrets)) you'll be able to
choose it from the list. Alternatively, you'll need to create a new sink by creating its corresponding secret. In our example, we'll use an existing sink to a ClickHouse database.
If you already have configured any sinks previously (for more information, see [Mirror Secrets](/mirror/manage-secrets)) you'll be able to
choose it from the list. Alternatively, you'll need to create a new sink by creating its corresponding secret. In our example, we'll use an existing sink to a ClickHouse database.
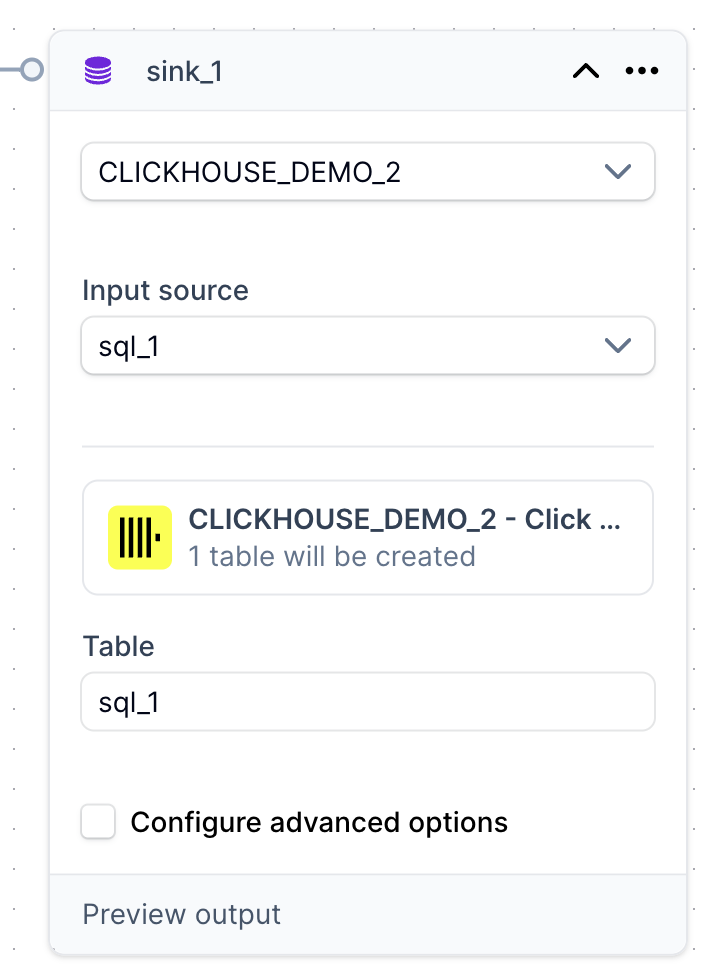 Once you select the sink, you'll have some configuration options available to define how the data will be written into your database as well as anoter `Preview Output` button to see the what the final shape of the data will be; this is a very convenient utility
in cases where you might have multiple sources and transforms in your pipeline and you want to iterate on its logic without having to redeploy the actual pipeline every time.
4. **Confirm and deploy**
Last but not least, we need to define a name for the pipeline. You can do that at the top center input of your screen. For this example, we are going to call it `ethereum-raw-logs`
Up to this point, your canvas should look similar to this:
Once you select the sink, you'll have some configuration options available to define how the data will be written into your database as well as anoter `Preview Output` button to see the what the final shape of the data will be; this is a very convenient utility
in cases where you might have multiple sources and transforms in your pipeline and you want to iterate on its logic without having to redeploy the actual pipeline every time.
4. **Confirm and deploy**
Last but not least, we need to define a name for the pipeline. You can do that at the top center input of your screen. For this example, we are going to call it `ethereum-raw-logs`
Up to this point, your canvas should look similar to this:
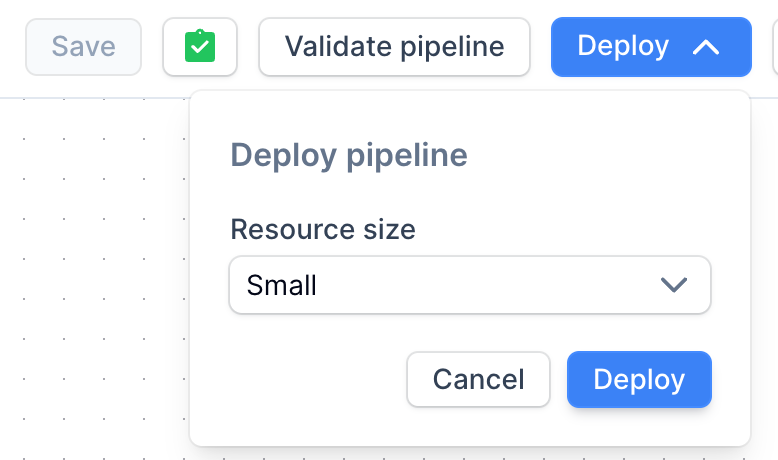
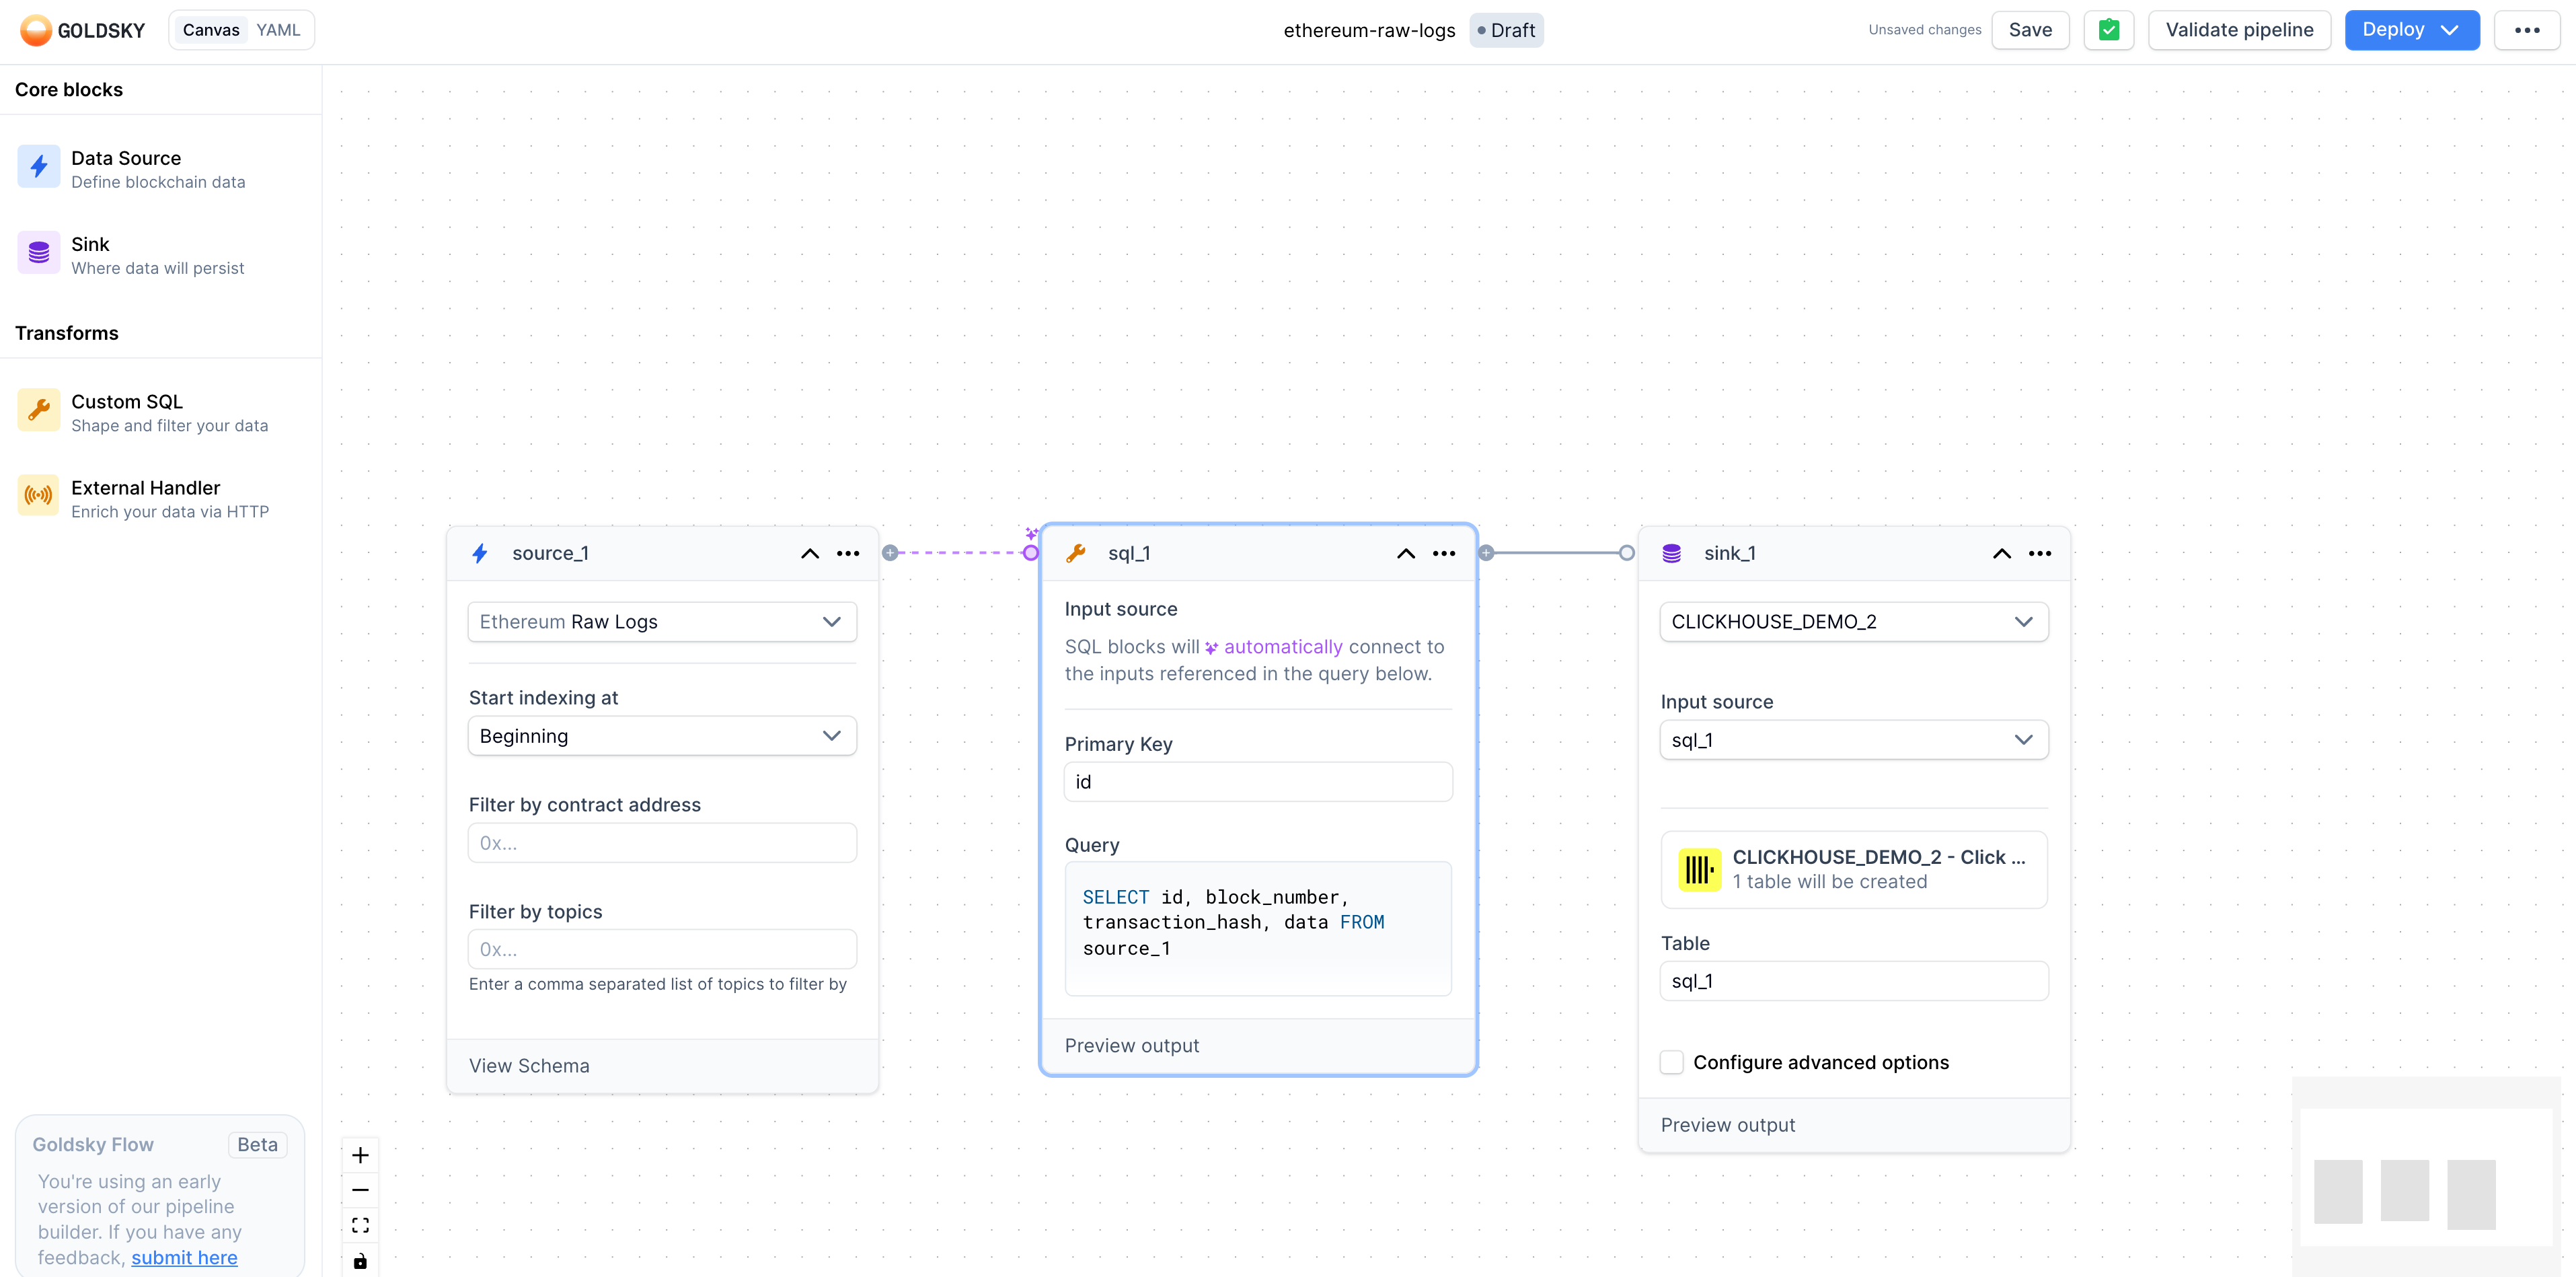 Click on the `Deploy` button on the top right corner and specify the [resource size](/mirror/about-pipeline#resource-sizing); for this example you can choose the default `Small`.
 You should now be redirected to the pipelines details page
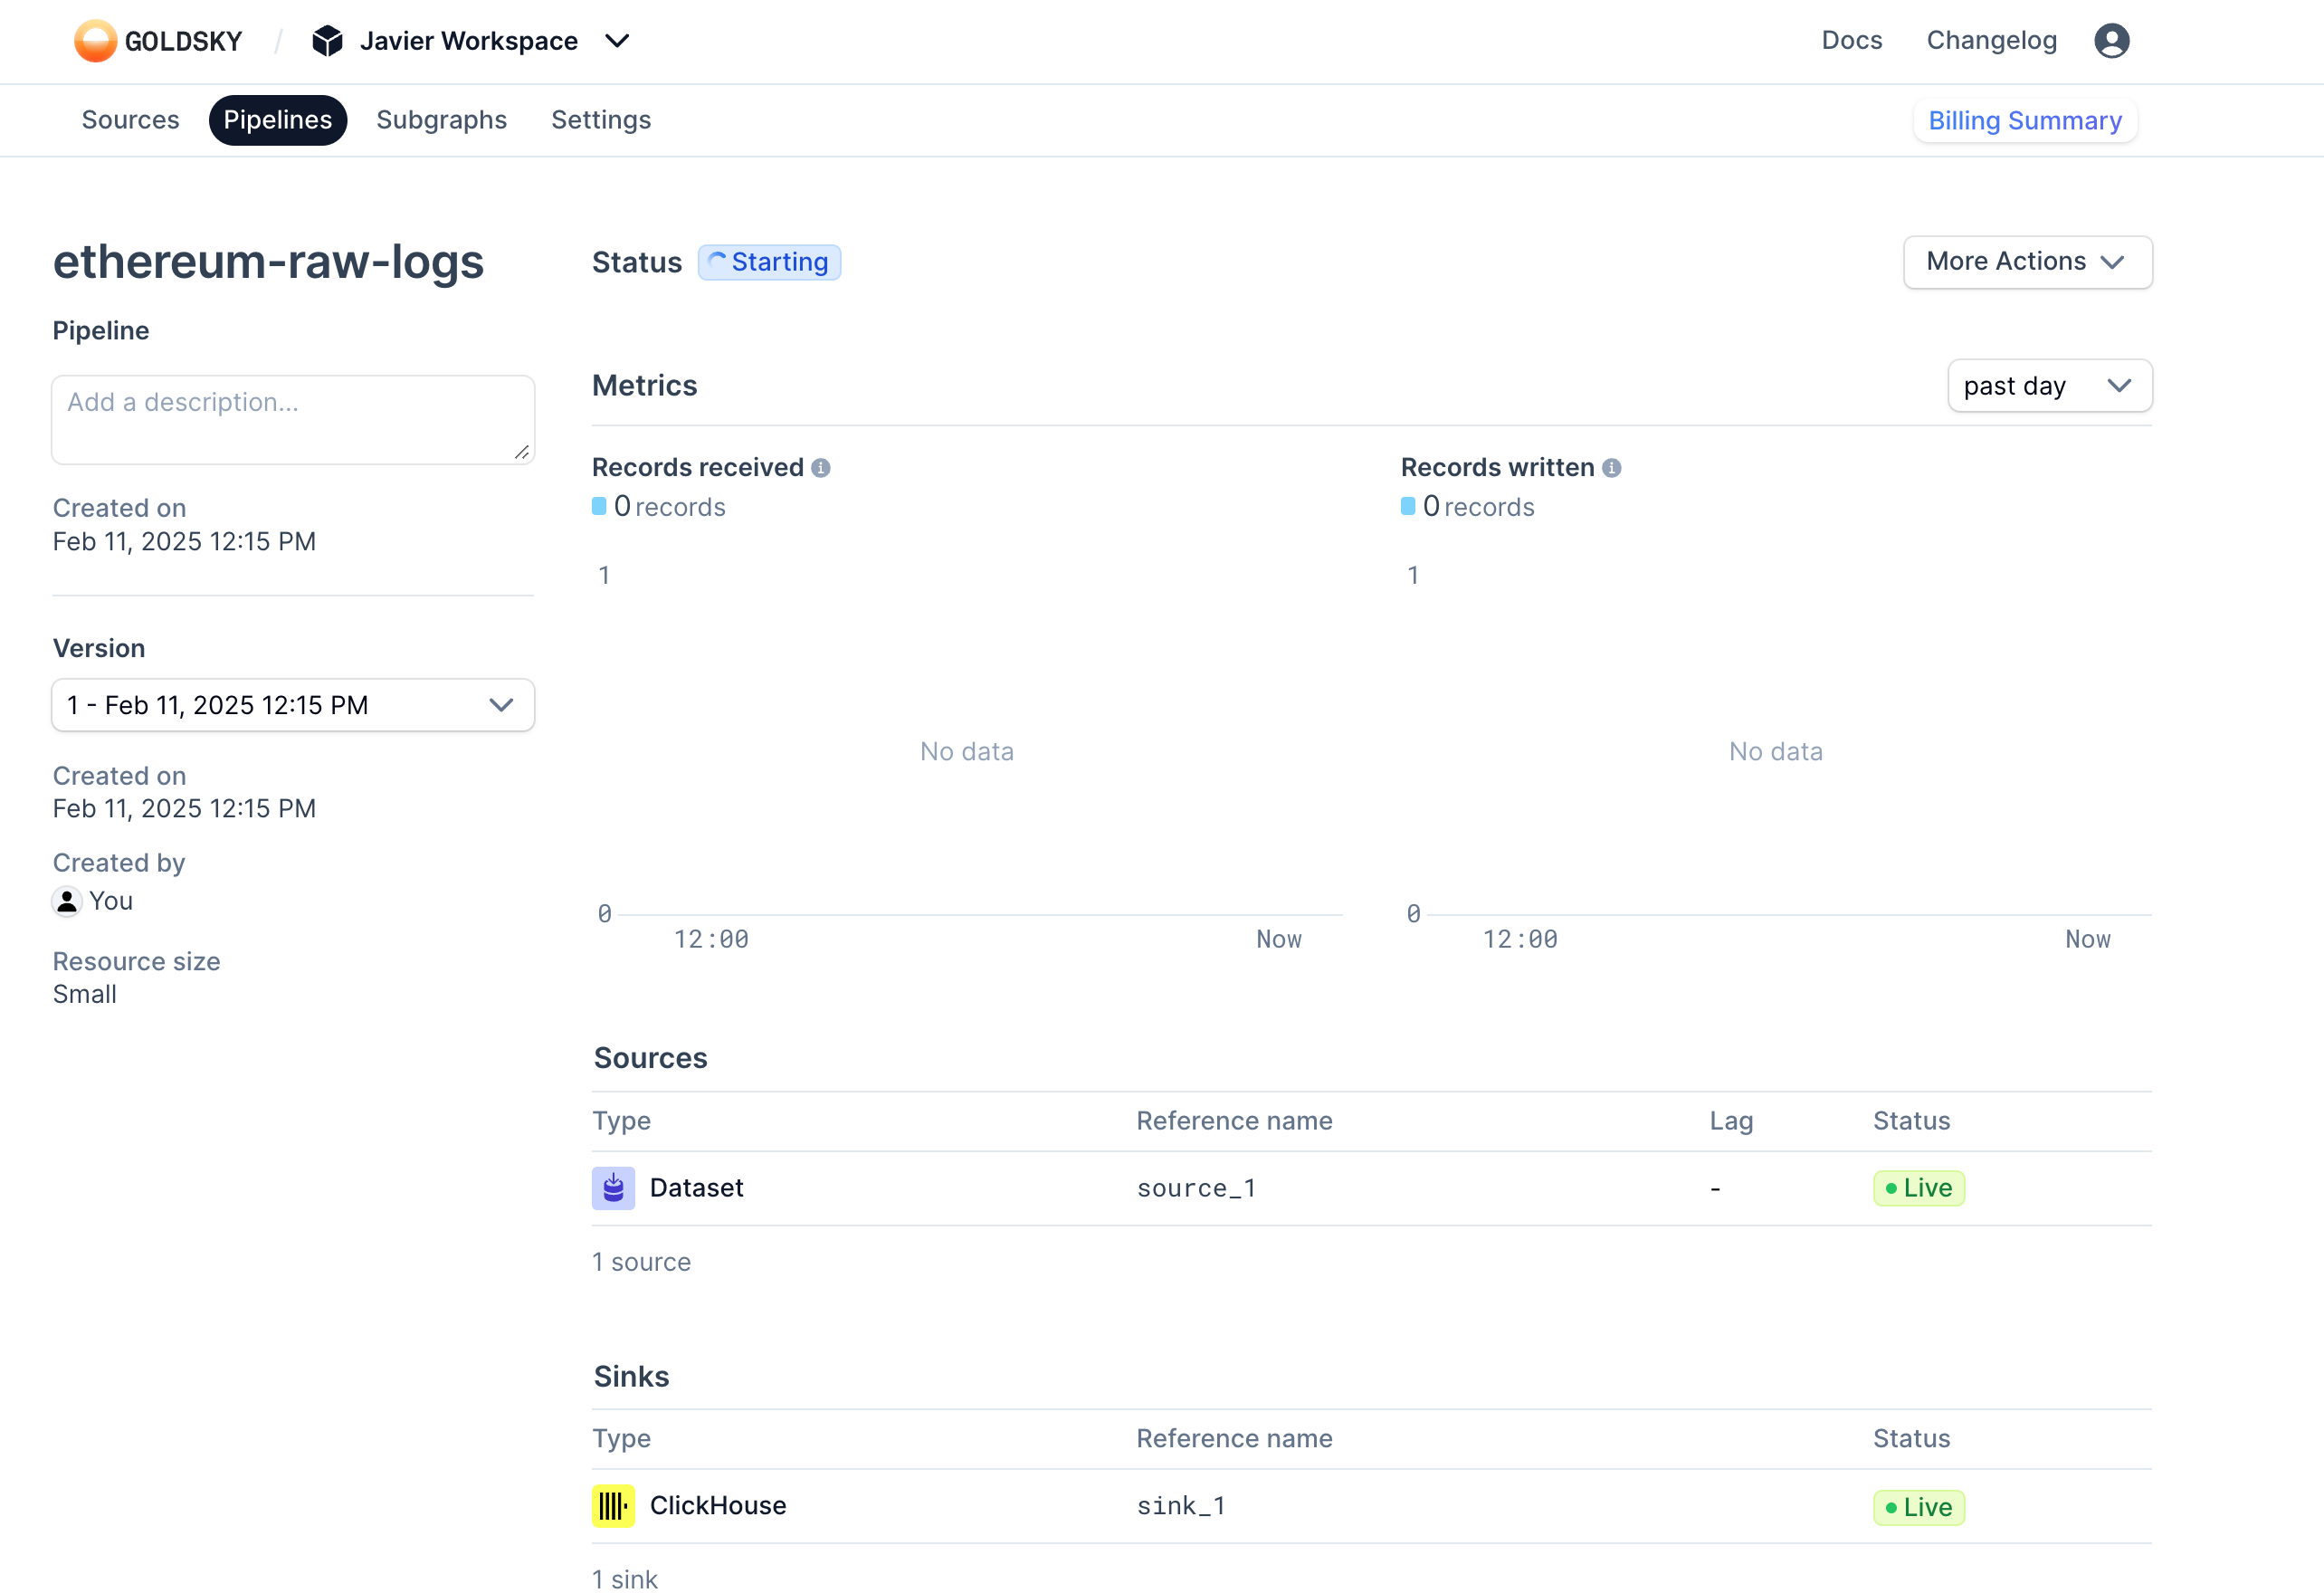 Congratulations, you just deployed your first pipeline using Goldsky Flow! 🥳
Assuming the sink is properly configured you should start seeing data flowing into your database after a few seconds.
If you would like to update the components of your pipeline and deploy a newer version (more on this topic [here](/mirror/about-pipeline))
you can click on the `Update Pipeline` button on the top right corner of the page and it will take you back onto the Flow canvas so you can do any updates on it.
Congratulations, you just deployed your first pipeline using Goldsky Flow! 🥳
Assuming the sink is properly configured you should start seeing data flowing into your database after a few seconds.
If you would like to update the components of your pipeline and deploy a newer version (more on this topic [here](/mirror/about-pipeline))
you can click on the `Update Pipeline` button on the top right corner of the page and it will take you back onto the Flow canvas so you can do any updates on it.
 There's a couple of things about Flow worth highlighting:
* Pipelines are formally defined using [configuration files](/mirror/reference/config-file/pipeline) in YAML. Goldsky Flow abstract that complexity for us so that we can just
create the pipeline by dragging and dropping its components. You can at any time see the current configuration definition of the pipeline by switching the view to `YAML` on the top left corner. This is quite useful
in cases where you'd like to version control your pipeline logic and/or automate its deployment via CI/CD using the CLI (as explained in next section)
There's a couple of things about Flow worth highlighting:
* Pipelines are formally defined using [configuration files](/mirror/reference/config-file/pipeline) in YAML. Goldsky Flow abstract that complexity for us so that we can just
create the pipeline by dragging and dropping its components. You can at any time see the current configuration definition of the pipeline by switching the view to `YAML` on the top left corner. This is quite useful
in cases where you'd like to version control your pipeline logic and/or automate its deployment via CI/CD using the CLI (as explained in next section)
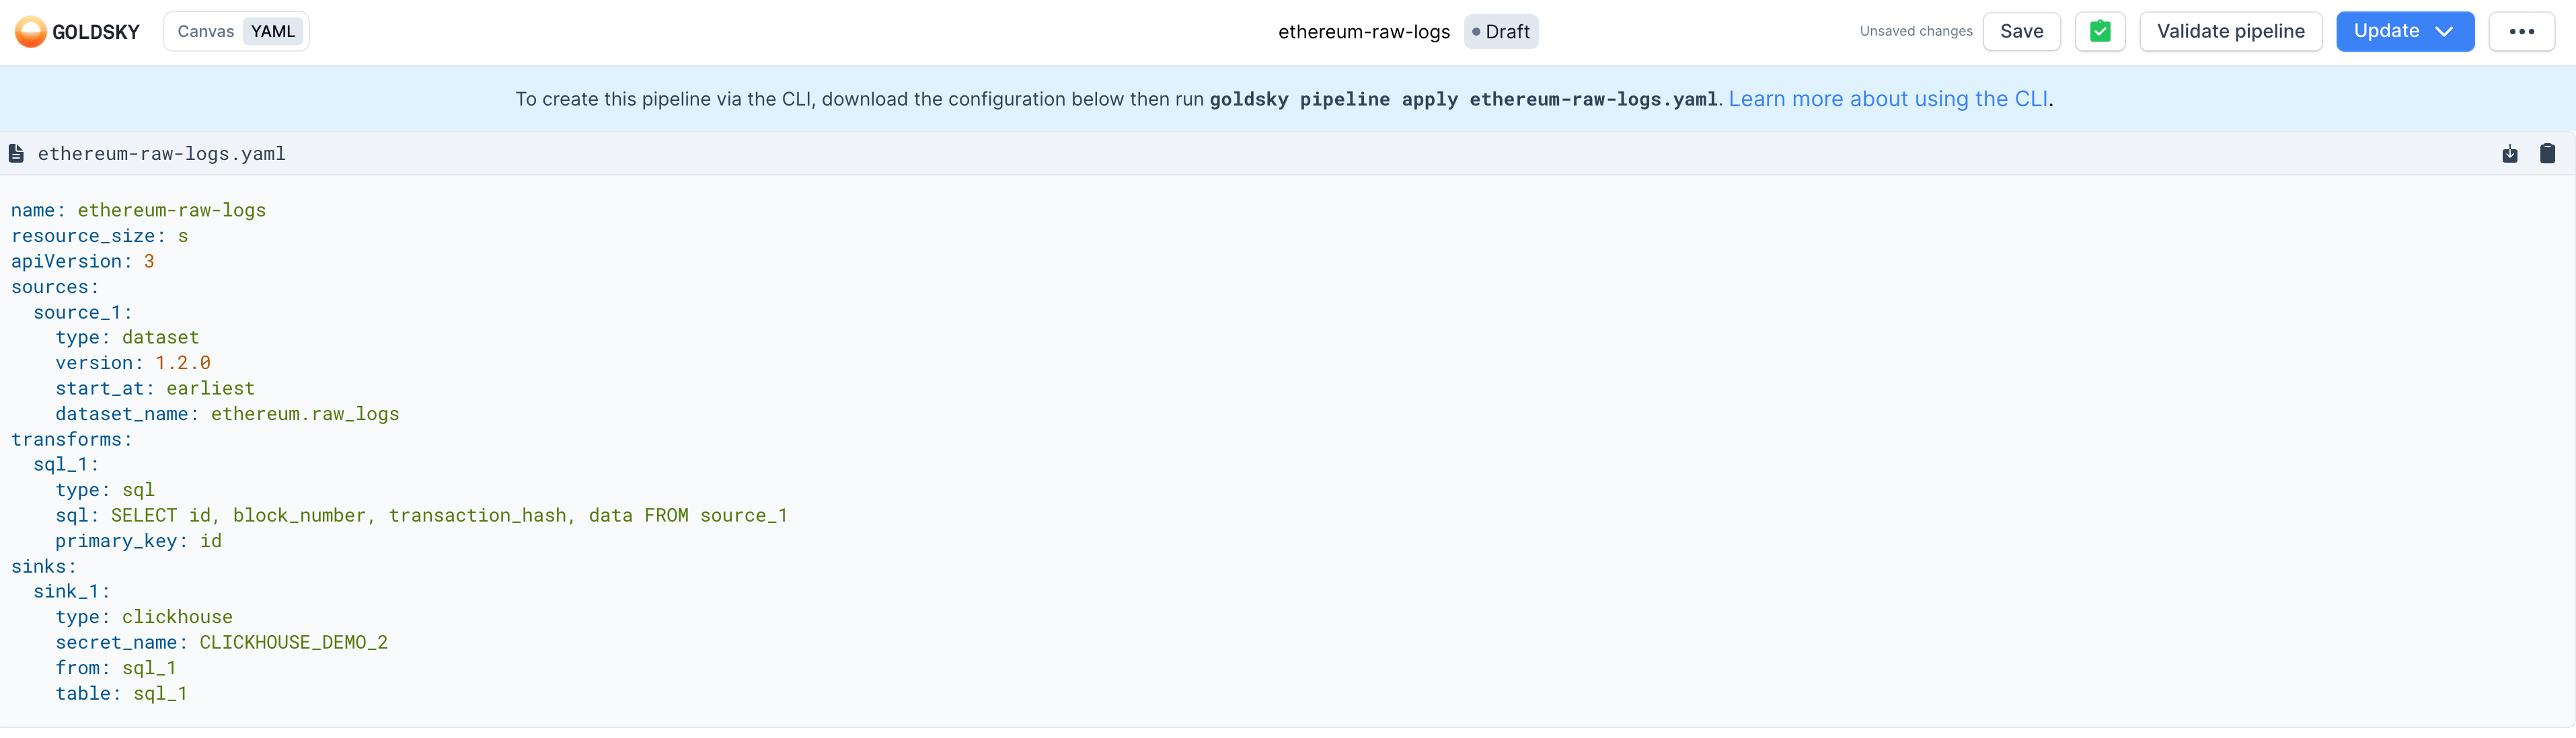 * Pipeline components are interconnected via reference names: in our example, the source has a default reference name of `source_1`; the transform (`sql_1`) reads from `source_1` in its SQL query; the sink (`sink_1`)
reads the result from the transform (see its `Input source` value) to finally emit the data into the destination. You can modify the reference names of every component of the pipeline on the canvas, just bear in mind
the connecting role these names play.
Read on the following sections if you would like to know how to deploy pipelines using the CLI.
## Goldsky CLI
1. Install the Goldsky CLI:
**For macOS/Linux:**
```shell theme={null}
curl https://goldsky.com | sh
```
**For Windows:**
```shell theme={null}
npm install -g @goldskycom/cli
```
Windows users need to have Node.js and npm installed first. Download from [nodejs.org](https://nodejs.org) if not already installed.
2. Go to your [Project Settings](https://app.goldsky.com/dashboard/settings) page and create an API key.
3. Back in your Goldsky CLI, log into your Project by running the command `goldsky login` and paste your API key.
4. Now that you are logged in, run `goldsky` to get started:
```shell theme={null}
goldsky
```
There are two ways in which you can create pipelines with the CLI:
* Interactive
* Non-Interactive
### Guided CLI experience
This is a simple and guided way to create pipelines via the CLI.
Run `goldsky pipeline create ` in your terminal and follow the prompts.
In short, the CLI guides you through the following process:
1. Select one or more source(s)
2. Depending on the selected source(s), define transforms
3. Configure one or more sink(s)
### Custom Pipeline Configuration File
This is an advanced way to create a new pipeline. Instead of using the guided CLI experience (see above), you create the pipeline configuration on your own.
A pipeline configuration is a YAML structure with the following top-level properties:
```yaml theme={null}
name:
apiVersion: 3
sources: {}
transforms: {}
sinks: {}
```
Both `sources` and `sinks` are required with a minimum of one entry each. `transforms` is optional and an empty object (`{}`) can be used if no transforms are needed.
Full configuration details for Pipelines is available in the [reference](/mirror/reference/config-file/pipeline) page.
As an example, see below a pipeline configuration which uses the Ethereum Raw Logs dataset as source, uses a transform to select specific data fields and sinks that data into a Postgres database whose connection details are stored within the `A_POSTGRESQL_SECRET` secret:
```yaml pipeline.yaml theme={null}
name: ethereum-raw-logs
apiVersion: 3
sources:
ethereum_raw_logs:
dataset_name: ethereum.raw_logs
version: 1.0.0
type: dataset
start_at: latest
transforms:
select_relevant_fields:
sql: |
SELECT
id,
address,
topics,
data,
block_number,
block_hash,
transaction_hash
FROM
ethereum_raw_logs
primary_key: id
sinks:
postgres:
type: postgres
table: eth_logs
schema: goldsky
secret_name: A_POSTGRESQL_SECRET
from: select_relevant_fields
```
Note that to create a pipeline from configuration that sinks to your datastore, you need to have a [secret](/mirror/manage-secrets) already configured on your Goldsky project and reference it in the sink configuration.
Run `goldsky pipeline apply ` in your terminal to create a pipeline.
Once your pipeline is created, run `goldsky pipeline start ` to start your pipeline.
## Monitor a pipeline
When you create a new pipeline, the CLI automatically starts to monitor the status and outputs it in a table format.
If you want to monitor an existing pipeline at a later time, use the `goldsky pipeline monitor ` CLI command. It refreshes every ten seconds and gives you insights into how your pipeline performs.
Or you may monitor in the Pipeline Dashboard page at `https://app.goldsky.com/dashboard/pipelines/stream//` where you can see the pipeline's `status`, `logs`, `metrics`.
* Pipeline components are interconnected via reference names: in our example, the source has a default reference name of `source_1`; the transform (`sql_1`) reads from `source_1` in its SQL query; the sink (`sink_1`)
reads the result from the transform (see its `Input source` value) to finally emit the data into the destination. You can modify the reference names of every component of the pipeline on the canvas, just bear in mind
the connecting role these names play.
Read on the following sections if you would like to know how to deploy pipelines using the CLI.
## Goldsky CLI
1. Install the Goldsky CLI:
**For macOS/Linux:**
```shell theme={null}
curl https://goldsky.com | sh
```
**For Windows:**
```shell theme={null}
npm install -g @goldskycom/cli
```
Windows users need to have Node.js and npm installed first. Download from [nodejs.org](https://nodejs.org) if not already installed.
2. Go to your [Project Settings](https://app.goldsky.com/dashboard/settings) page and create an API key.
3. Back in your Goldsky CLI, log into your Project by running the command `goldsky login` and paste your API key.
4. Now that you are logged in, run `goldsky` to get started:
```shell theme={null}
goldsky
```
There are two ways in which you can create pipelines with the CLI:
* Interactive
* Non-Interactive
### Guided CLI experience
This is a simple and guided way to create pipelines via the CLI.
Run `goldsky pipeline create ` in your terminal and follow the prompts.
In short, the CLI guides you through the following process:
1. Select one or more source(s)
2. Depending on the selected source(s), define transforms
3. Configure one or more sink(s)
### Custom Pipeline Configuration File
This is an advanced way to create a new pipeline. Instead of using the guided CLI experience (see above), you create the pipeline configuration on your own.
A pipeline configuration is a YAML structure with the following top-level properties:
```yaml theme={null}
name:
apiVersion: 3
sources: {}
transforms: {}
sinks: {}
```
Both `sources` and `sinks` are required with a minimum of one entry each. `transforms` is optional and an empty object (`{}`) can be used if no transforms are needed.
Full configuration details for Pipelines is available in the [reference](/mirror/reference/config-file/pipeline) page.
As an example, see below a pipeline configuration which uses the Ethereum Raw Logs dataset as source, uses a transform to select specific data fields and sinks that data into a Postgres database whose connection details are stored within the `A_POSTGRESQL_SECRET` secret:
```yaml pipeline.yaml theme={null}
name: ethereum-raw-logs
apiVersion: 3
sources:
ethereum_raw_logs:
dataset_name: ethereum.raw_logs
version: 1.0.0
type: dataset
start_at: latest
transforms:
select_relevant_fields:
sql: |
SELECT
id,
address,
topics,
data,
block_number,
block_hash,
transaction_hash
FROM
ethereum_raw_logs
primary_key: id
sinks:
postgres:
type: postgres
table: eth_logs
schema: goldsky
secret_name: A_POSTGRESQL_SECRET
from: select_relevant_fields
```
Note that to create a pipeline from configuration that sinks to your datastore, you need to have a [secret](/mirror/manage-secrets) already configured on your Goldsky project and reference it in the sink configuration.
Run `goldsky pipeline apply ` in your terminal to create a pipeline.
Once your pipeline is created, run `goldsky pipeline start ` to start your pipeline.
## Monitor a pipeline
When you create a new pipeline, the CLI automatically starts to monitor the status and outputs it in a table format.
If you want to monitor an existing pipeline at a later time, use the `goldsky pipeline monitor ` CLI command. It refreshes every ten seconds and gives you insights into how your pipeline performs.
Or you may monitor in the Pipeline Dashboard page at `https://app.goldsky.com/dashboard/pipelines/stream//` where you can see the pipeline's `status`, `logs`, `metrics`.